-> ACEBTKEY USER MANUAL<-
Quick Q & A
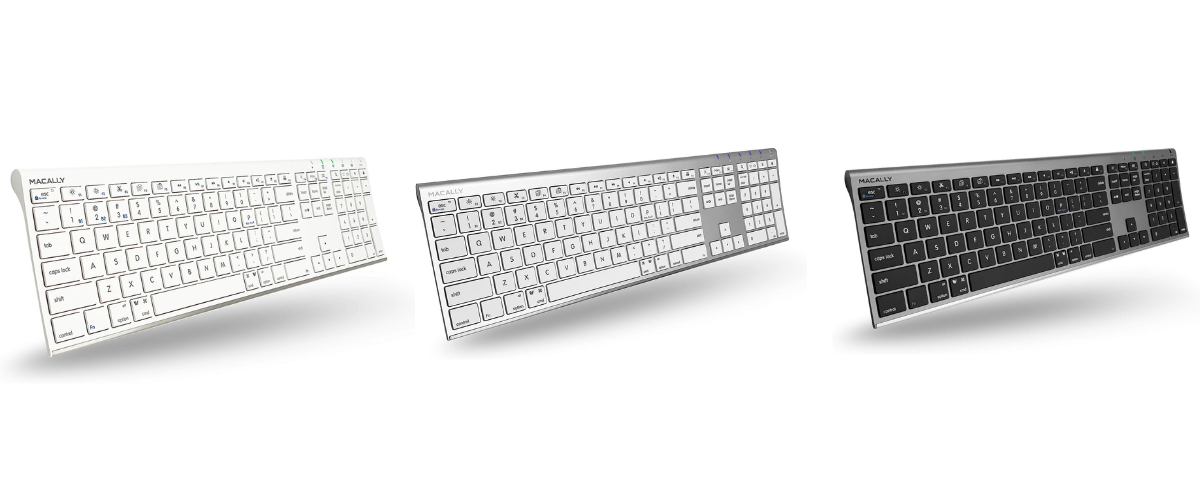
Q: What is the difference between the keyboards?
How to pair keyboard to your device
Note: The sync process will vary depending on the device we are connecting to (i.e. iMac Studio, Windows, and iPad).
To pair with B1 with a Mac (this includes a Mac mini, Macbook, iMac, Mac Studio):
- Turn the keyboard on.
- Go to System Preferences/Settings > Bluetooth
- The B1 LED light should be blinking rapidly, if it is not blinking, locate and press the Fn + 1 key (on your number row) at the same time, then let go. Then press Fn + P at the same time and then let go.
- Click Connect
Note: To set up a different channel, change the '1' in step 3 to either 2 or 3.
For Apple users only - Keyboard set-up assistant
Once you have successfully connected your keyboard to your Mac, you may get a pop-up that states you need to identify your keyboard (Keyboard Set up Assistant). Here are the steps:
- Click on continue
- Press and release the 'Z' key
- Press and release the '/?' key
- Choose 'ANSI' as your region
- Click 'Done'
Note: There are two instances when this pop up may not come up - The first being the connection was unsuccessful. You can check if this is the case by doing a quick test type in any application you'd like (i.e. Google, Safari, Notes), if you are not able to type, you may want to go through the sync instructions again. The second reason the pop up may not appear consistently is because it only triggers when a new, unknown USB or Bluetooth keyboard is detected, or if the system fails to recognize an existing one due to connectivity glitches. You can always manually do it by:
Settings > Keyboards > Change keyboard type - (go through process listed above)
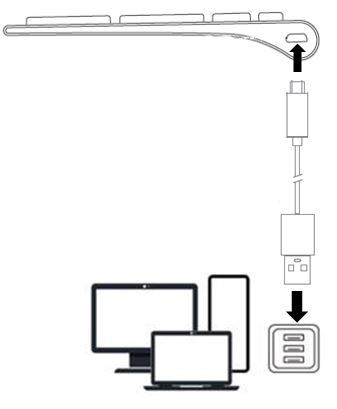
Where is the charging cable located?
The charging cable is in the package. When you first open the box there will be an opening on the top where the cable will be tucked in. Depending on the version you have, the charging port with either be Micro-USB or USB-C.
Here are some Tips:
Tip 1: Charging the keyboard via a wall adapter will be the most efficient. Using a USB port will work as well, but sleep mode may stop charging.
Tip 2: You can charge the keyboard while using it.
Tip 3: Turning the keyboard off while not in use can help extend the battery life.
Note: The updated versions will have a USB-C port instead of a Micro-USB port.
What are the symbols on the LED underneath the LED lights?
There are five LED light indicators shown below. This will tell you what the symbols mean and what each symobolizes. The color will also be listed below the picture.
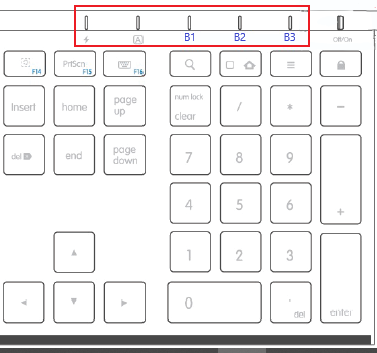
Symbols and LED light colors (From left to right):
Thunder bolt icon: Charging Indicator. Color:
- Charging: Red
- Fully Charged: Green
"A" in a square icon: Caps Lock Indicator. Color: Green
B1 icon: Bluetooth channel 1. Color: Blue
B2 icon: Bluetooth channel 2. Color: Blue
B3 icon: Bluetooth channel 3. Color: Blue
Note: Off/On switch on the far right is not an LED.
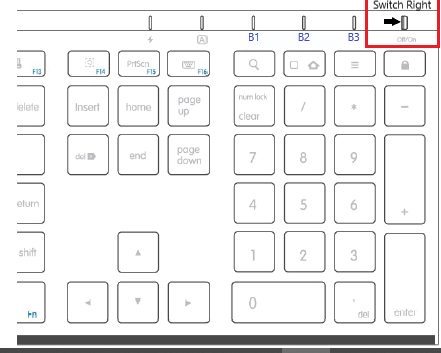
How do I turn the keyboard on or off
On the top right of the keyboard, you should see a series of LED lights. On the far right, there will be an On/Off switch. Push the tab to the right so the keyboard will turn on. The picture is shown below:
Two Important tips:
Important tip 1: Turn your keyboard off when you finish using it - It will conserve battery.
Important tip 2: Turn your keyboard off when you are charging with a wall adapter. It will charge more efficiently.
How to pair with a Windows device:
1. Keyboard should be on.
2. Settings > Bluetooth > Add Bluetooth device > Choose option which includes Keyboards/Mouse (leave this screen open)
3. On the Macally keyboard, locate and press the Fn + 1 key (on your number row) at the same time, then let go. Then press Fn + P at the same time and then let go.
4. You should get a rapid blinking LED, and soon after the ACEBTKEY should pop up under Nearby Devices, press Connect.
Note: To set up a different channel, change the '1' in step 3 to either 2 or 3.
How to pair with an iPad:
1. Keyboard should be on.
2. Go to Settings > Bluetooth (leave this screen open)
3. On the Macally keyboard, locate and press the Fn + 1 key (on your number row) at the same time, then let go. Then press Fn + P at the same time and then let go.
4. You should get a rapid blinking LED, and soon after the ACEBTKEY should pop up under Nearby Devices, press Connect.
Note: To set up a different channel, change the '1' in step 3 to either 2 or 3.
The keypad is not working on my keyboard
After each method, do a test type in an application to see if the method worked for you.
First method: Hold Shift + Delete and let go of both.
Second method: Press clear on number pad.
Third method:
Old OS (i.e. High Sierra):
System Preferences → Accessibilities → Mouse and Track pad → Uncheck Enable Mouse Keys
New OS (i.e. Tahoe):
System Preferences → Accessibilities → Pointer Control → Alternate Control Methods → Uncheck Enable Mouse Keys
Windows
Method 1: On-Screen Keyboard (Turn Num Lock On)
Control + Windows + O > Click on "Options" > Click on "Show Numeric Keypad" > Click on "Num Lock" > Close the On-Screen Keyboard.
Method 2: Disable mouse keys in Ease of Access (Mouse)
Click on the "Windows" icon > Click on "Settings" > Click on "Ease of Access" > Click on "Mouse" > Under "Control your mouse with a keypad" > Make sure that Turn on mouse keys is off.
Method 3: Disable mouse keys in the Ease of Access Center (Mouse)
Click on the "Windows" icon > Type "Control Panel" in the search bar and select it > Click on "Ease of Access Center" > Click on "Make the mouse easier to use" > Under control the mouse with the keyboard uncheck "Turn on Mouse Keys"
Method 4: Disable mouse keys in the Ease of Access Center (Keyboard)
Click on the "Windows" icon > Type "Control Panel" in the search bar and select it > Click on "Ease of Access Center" > Click on "Make the keyboard easier to use" > Under control the mouse with the keyboard uncheck "Turn on Mouse Keys"